In this article, we’ll provide a detailed guide on Dobinson sway bar relocation instructions. The guide will cover the installation process, important considerations, and the benefits of this modification. Whether you’re a seasoned mechanic or a beginner, this guide will help you navigate the installation process step by step.
Introduction to Dobinson Sway Bar Relocation Kits
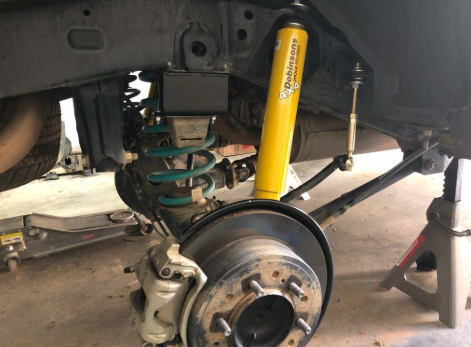
A sway bar, also known as an anti-roll bar, helps reduce body roll during sharp turns by connecting the suspension of a vehicle’s left and right sides. It provides stability, which is particularly important in off-road vehicles.
Dobinsons, a trusted manufacturer of suspension components, offers sway bar relocation kits that make it easier to install larger suspension systems or improve ground clearance. These relocation kits ensure that the sway bar continues functioning correctly without interfering with other parts of your suspension, significantly when modifying or upgrading your vehicle for off-road activities.
Why Relocate the Sway Bar?
Relocating the sway bar becomes necessary in certain situations, such as:
- Increased Suspension Lift: When you lift the vehicle to accommodate larger tires or improve off-road capabilities, the original sway bar mounting points may no longer be appropriate or accessible.
- Upgrading Suspension: If you’re upgrading your suspension components, such as installing longer shock absorbers, the sway bar may need to be repositioned to maintain proper vehicle handling and performance.
- Improving Ground Clearance: The relocation kit moves the sway bar to a position that doesn’t interfere with the vehicle’s underbody, helping to improve ground clearance, especially on rough trails.
Key Features of Dobinson Sway Bar Relocation Kits
Dobinson sway bar relocation kits come with several features that make them stand out:
| Feature | Details |
|---|---|
| Durability | Made from high-quality materials designed to last. |
| Easy Installation | Typically comes with all necessary components for easy installation. |
| Precision Fit | Engineered to fit specific vehicle models. |
| Improved Handling | Helps maintain optimal vehicle stability during off-roading. |
| Enhanced Ground Clearance | Repositions the sway bar to avoid clearance issues. |
Tools and Materials Needed
Before beginning the Installation of your Dobinson sway bar relocation kit, gather the following tools and materials:
- Dobinson Sway Bar Relocation Kit (specific to your vehicle)
- Socket Wrench Set
- Torque Wrench
- Jack and Jack Stands
- Jack for Vehicle Lift
- Safety Glasses
- Gloves
- Anti-seize Lubricant (optional)
- Power Drill (for mounting relocation brackets)
- Measuring Tape (for proper alignment)
- Marker or Chalk (for marking drill points)
Step-by-Step Instructions for Installation
Preparing for Installation
Before starting, ensure your vehicle is on a level surface and the parking brake is engaged. Use the jack to lift the car and place it on jack stands for safety. Remove the tires to access the suspension components easily.
Removing the Old Sway Bar
- Disconnect the Sway Bar Links: Use a socket wrench to remove the bolts connecting the sway bar to the suspension links. Keep these bolts, as they may be reused later.
- Remove the Existing Sway Bar Mounts: Using a wrench, undo the bolts that attach the sway bar to its original mounting points. Set the sway bar aside temporarily.
At this point, you may notice that the vehicle’s suspension sags slightly due to the sway bar being removed. This is normal.
Installing the Relocation Kit
- Position the Relocation Brackets: Position the provided relocation brackets in the desired location on the vehicle’s frame. It’s crucial to check the alignment and ensure they don’t interfere with other suspension components.
- Drill Holes (If Necessary): Some kits may require drilling new holes for the brackets. Use the measuring tape to accurately measure the position and then mark the drilling points. Drill the holes using a power drill.
- Attach the Relocation Brackets: Once the holes are drilled (if needed), secure the brackets in place using the provided bolts and washers. Ensure that the brackets are tightly secured, as this will affect the sway bar’s stability.
Reinstalling the Sway Bar
- Reattach the Sway Bar: Place the sway bar back into the newly relocated mounting position. Connect the original sway bar links to the relocation brackets using the sway bar links.
- Tighten All Bolts: Use a torque wrench to tighten all bolts to the specified torque rating (as provided in the kit instructions). This ensures the sway bar is securely in place and won’t shift during use.
- Check Clearances: Double-check that the sway bar does not interfere with any other suspension components and operates smoothly.
Final Adjustments
- Reinstall the tires and lower the vehicle off the jack stands.
- Check the vehicle’s handling on a test drive to ensure the sway bar functions correctly.
- Make any fine-tuning adjustments to the sway bar links to improve vehicle stability.
Maintenance Tips
Once your Dobinson sway bar relocation kit is installed, follow these maintenance tips to ensure long-term performance:
- Regularly Check the Sway Bar Mounts: Periodically check the relocation kit brackets and sway bar links for any signs of wear or loosening bolts.
- Lubricate the Sway Bar Links: Apply a small anti-seize lubricant to the sway bar links to prevent rust and improve movement.
- Inspect Suspension Components: Also, check other suspension parts, such as shock absorbers and bushings, as they can wear out over time.
Common Issues and Troubleshooting
| Problem | Solution |
|---|---|
| Sway bar links are too tight | Loosen the sway bar links slightly and recheck handling. |
| Sway bar rattling during driving | Check the sway bar mounting points for loose bolts or debris. |
| Uneven vehicle handling | Recheck the relocation bracket installation for proper alignment. |
Conclusion
The Dobinson sway bar relocation kit is an excellent solution for off-road enthusiasts and those looking to improve their vehicle’s suspension system. By following the step-by-step instructions provided in this guide, you can successfully install the kit, improving your vehicle’s handling and ground clearance.
Remember, proper Installation and regular maintenance will ensure that your sway bar continues to function efficiently, offering optimal performance during off-road excursions and daily driving. With the right tools and time, you can quickly complete this upgrade and enhance your vehicle’s capabilities.